
|
|
|
| Newsletter List | |
|
|
|
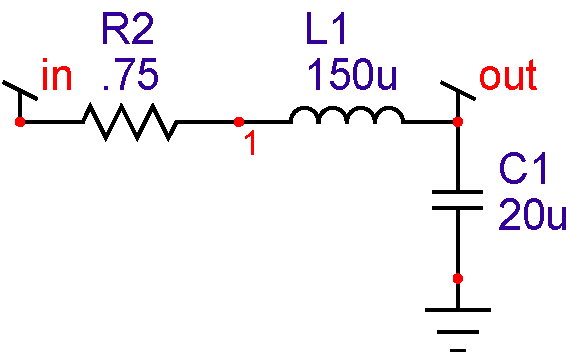
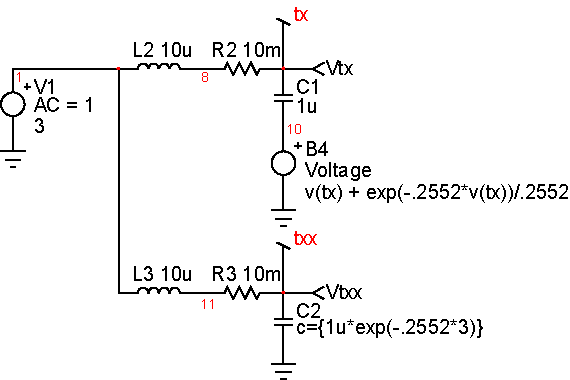
Hardware Transfer Function Analyzers, TFA’s, are used to measure control systems gain, admittance, impedance and stability margins. SPICE usually performs these functions using its AC analysis capability, refer to the GFT, http://www.intusoft.com/gft.htm, for an explanation of how this is done. From time-to-time it is necessary to perform the TFA operation based on a time domain simulation. The time domain solution must take several points per cycle of the test signal to meet the Nyquist criteria. Moreover, it may be necessary to run each test frequency for many cycles, or sweep the frequency slowly in order to reduce the effects of switching noise, and resolve high Q resonances. Plus, signal strength must be small enough to keep the circuit in the linear region. All of these constraints potentially add up to enormous simulation time. This article will describe the SPICE model for a TFA and develop a rational for setting the sweep time, filter bandwidth, and frequency limits. First, define a signal in the complex plain as follows: |
|
||||||||||||||||||
| v = Re*cos(wt) + jIm*sin(wt) | |||||||||||||||||||
where |
Re is the real part Im is the imaginary part w is the radian frequency j = sqrt(-1) |
|
|||||||||||||||||
Then separate v into 2 channels by multiplying by cos(wt) for one channel and *sin(wt) for the other
Passing Vr and Vi through a lowpass filter removes the sin-cos products because they are at 2w. This results in the average values indicated below. Notice that DC components in the in and out signals give rise to AC signals at the injection frequency. A method of AC coupling is needed. The average values are:
This procedure can be carried out for signals defined at nodes in and out. Then a complex vector is formed for each signal, using the ICL script notation:
The IsSpice4 ICL, http://www.intusoft.com/script/pages/index.htm allows algebraic manipulation of these complex vectors, so that:
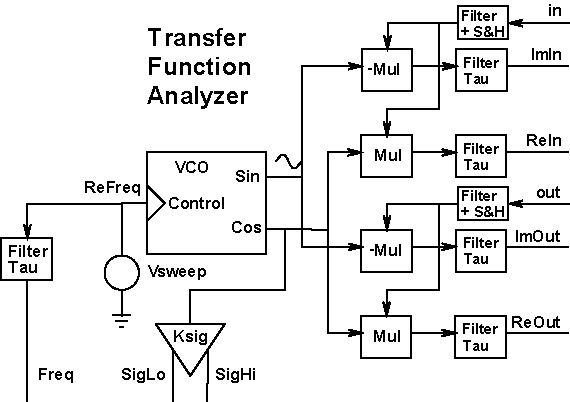
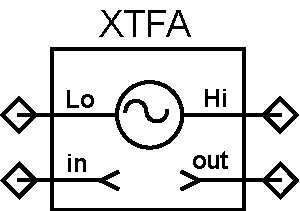
where db, phaseextend, and phase are ICL functions: The complete TFA block diagram is shown in Figure 1. Figure 1: A SPICE model for a Transfer Function Analyzer with Freq delayed to match the output delays. The approach taken here is to sweep the signal frequency rather than stepping it through a set of discrete frequencies. The frequency will be swept using an exponential function of time:
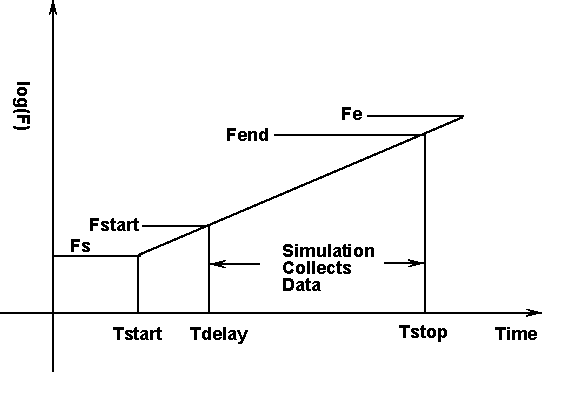
Fs and Fe are the first and last frequency to be swept. KVCO is a scaling constant that can be used to keep the sweep node voltage from getting too large. Tsweep is the length of time for the sweep, and Tstart is the time needed for the circuit to come to steady state before beginning the sweep. An exponential sweep is used in order to have equal frequency multiples in equal time. For example, the sweep time for the last octave is the same as for the first octave. However, the simulation time will get progressively longer on a per-octave basis because more time steps will be necessary as the frequency gets higher. That will penalize large Fe/Fs ratios. Fe/Fs, up to 50, gives reasonable results. Figure 2 shows how the frequency is swept over time. Figure 2: Graph of log(F) vs. Time shows how the sweep is computed. Several filters are needed to reject AC signals. First, the double frequency signal present in the multiplier output needs to be reduced. This is achieved using Bessel filters. Bessel filters have a constant delay property so that the time domain signals have no phase distortion. The 5th-order Bessel filter gain is -40db at f=1.54/Tau, as shown in Figure 3. Its primary purpose is to eliminate the double frequency component so that Tau > 1.54/Fstart. As the sweep begins, there will be a transient error that will pass in about 3 Bessel-filter time constants. Therefore, the time to start taking data will be Tstart+3*Tau. You can compute the actual starting frequency, Fstart, by solving the sweep generator exponential equation:
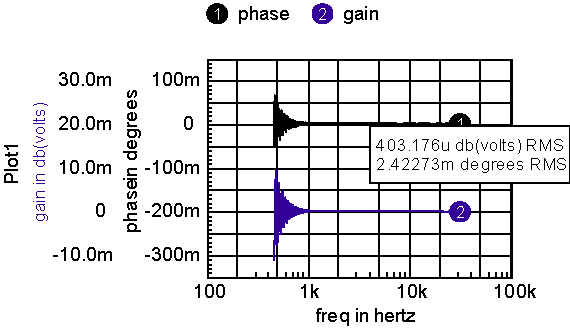
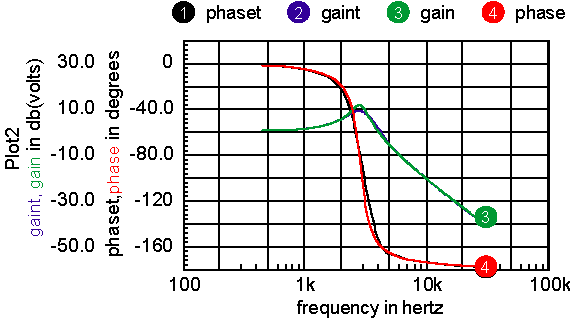
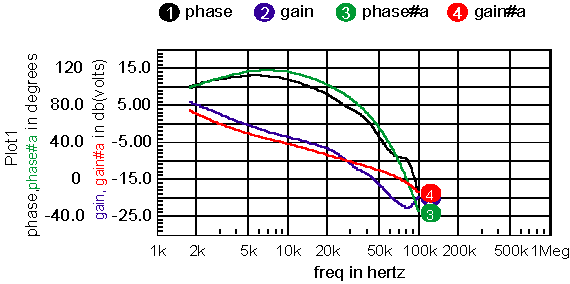
Figure 3: Filter is effective for Tstart > 1.54/Tau Figure 4 shows the result when applying the above equations for a gain of 1 with Fs=500, Fend=25k, Tsweep=100m. Figure 4: The ideal gain and phase should be zero, the gain error in gain is under .05%. Next, the input signal’s DC component needs to be removed because it results in an interfering signal at the injection frequency. This is accomplished by using a sample and hold at the output of a first-order lowpass filter. This DC value is sampled at time Tdelay for both the in and out signals. It is then subtracted from the in and out signals. The sweep rate moves a tracking filter across the 500-to-25kHz frequency range. For narrow band resonance, an error will appear if the sweep time is too fast. Figure 5 shows a typical resonant circuit with Figure 6 showing the results for Tsweep=50ms. Both phase and gain show reduced accuracy because of the relatively fast sweep. Increasing sweep time to 100ms makes the error negligible for this case. Figure 5: An RLC test circuit Figure 6: Transient simulation results compared with the AC analysis for Tsweep=50m; results almost identical for Tsweep=100ms Now, the TFA can be put together into a model. Using the approach taken previously for the GFT models, the user will be required to name the TFA subcircuit XTFA. That allows the measurements scripts to reach into the subcircuit. For example, freq:XTFA is the frequency node. That simplifies the symbol as shown in figure 7. Figure 7: Only pins that are need for interconnection are brought out The model separates the signal, pins Hi and Lo, from the measurement pins, in and out. The separation allows the model to be used either as a single injection GFT type to measure “loop gain,” or to measure voltage transfer functions elsewhere in the control loop. Figure 8 shows how it works with the forward switching regulator used in the Intusoft Power Templates. Figure 8: Comparison of results from TFA simulation; The accuracy of the TFA measured data is dependant on signal strength. It may take some adjustment to get the “right” answer. Internally, the sweep signal is connected from cos:XTFA to cosx:XTFA, using a 1k resistor. It is then multiplied by a ramp function and the Vsigpk parameter. You can modulate its value externally by connecting a PWL function between cos:XTFA and cosx:XTFA. Generally, you can increase signal strength at higher frequencies when the loop gain is small. Clearly you don’t want to use the time domain TFA if an average model is available. But if an average model doesn’t exist for your specific application, it may take several days to make a new model. An extra hour or so of simulation time is a good trade-off. And, there are topologies such as some resonant converters, that have no suitable theory for making an average model. But be aware, the long simulations will push your memory limits, so consider upgrading to 1 or 2Gbytes of RAM and even getting a faster machine! |
|||||||||||||||||||
|
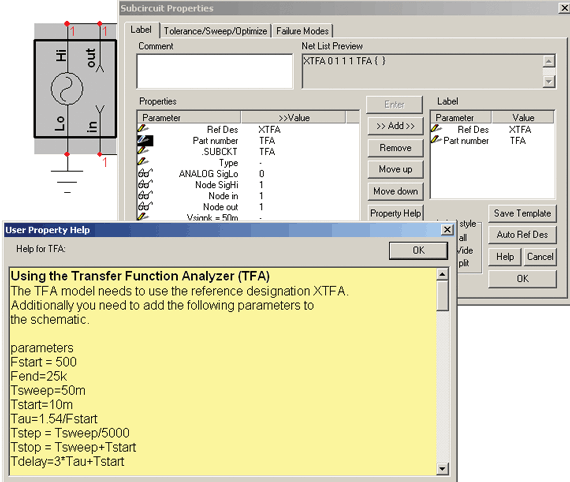
The TFA model is located in pwmprim.lib, and its symbols are in TFA.sym. Property help is in <Icapsdir>\pr\pwmprim\TFA.rtf. Property help is accessed from the label dialog as show in Figure 9. Figure 9: Dialogs shown after double clicking on the TFA symbol and pressing the property help button. You can copy and paste the parameters into a text block on the schematic. Text blocks labeled “parameters” in their first line will have the parameters inserted when the simulation is run. For builds > 2450, you can place parameters in the transient analysis setup as shown in Figure 10. |
|
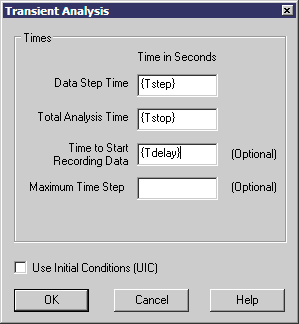 |
Figure 10: Enter parameters in the Transient Analysis setup dialog for builds > 2450. |
Remember to change the reference designation of the TFA model to XTFA so that the scripts can access the internal plot vectors. |
|
|
Divide by zero is the “number one” reason for behavioral models to fail. Looking at SPICE from the outside, it’s hard to understand why these errors occur. In our 8.x.11 release we added an IsSpice4 error message, “Possible numerical overflow in <B-element name>.” These types of warnings indicate that the simulator had to return results for numerical overflow conditions. When that happens, it’s more likely to mess up the matrix and create a non-convergent solution. You might be lucky and get to a stable answer, but the longer the simulation run the more likely your luck will run out. That means that you need to investigate the problem and take corrective action. We’ve discussed protection against divide by zero before, but now you may see the warning for expressions employing transcendental functions. When a transient simulation tries to find a solution, it starts by estimating the state variables based on the existing time step. The circuit model instances then load the matrix admittance values. For B-elements, the solution is moved from the right-hand side into the matrix using derivatives, if they are available as discussed in Newsletter 72, Convergence Methods. Then the solution is iterated to find a stable solution at that time step. If one can’t be found, the time step is scaled back and the process is repeated. So, when you add a behavioral expression, like v=asin(I(VM)), first IsSpice4 will evaluate asin(I(VM)). If I(VM) is >= 1 or <= -1, the simulator will complain. Remember, I(VM) is the solution made after each iteration. Placing a limit on it before an iteration is no guarantee that the solution will be within that limit. So one typically does the following:
But the problem comes when the derivative is calculated.
The derivative calculation uses the solution vector that could be out of bounds. There’s nothing you can do to protect against it. So until we invent something new, here’s a method of building an asin() model that works. First, open IntuScope and enter the following in the command window
Then, execute the script by pressing <Ctrl>+r. The IntuScope default for phase is degrees, but the IsSpice4 simulator works with radians. Therefore, go to the calculator menu and under Functions select PWL pwl.1pct. The pwl values will be placed in the Output Record window of IntuScope. Then, open SpiceNet and place a table model. It’s located in Behavioral\Function Block\TABLELIM. If you press x, then type tablelim and press <Enter>. The x-part browser dialog will come up. Navigate to the desired part. Press the <Place> button to position the part on your schematic. Then, double click the value field for xy_array (???) and press enter. Paste the pwl values from IntuScope’s Output Record window up to, but excluding the last comma (recommend full screen with IntuScope before copy/paste). Press ok, then select xy_array again to verify the data is pasted correctly. Dismiss the Properties dialog and set up a time-domain simulation that sweeps the input voltage from -2 to 2 volts (i.e., ramp usingPWL as voltage source stimulus to the table model). Run it and display the output in IntuScope. Press d to look at the derivative. Next, return to SpiceNet, press x, and place TABLE. It’s one entry above TABLELIM that you just used. Paste the xy_array into that model. Replace the previous model with TABLE and run the simulation again. Then press <Ctrl>+u in IntuScope for an update. Notice that the second model extrapolated the data based on derivatives, so that its out-of-bound results are continuous. If you limit the result, you can use the second model and the simulation may converge a bit better. So you might ask, who needs an asin function in a behavioral model? That leads to the next topic, calculating the boost limit in boost converters. |
|
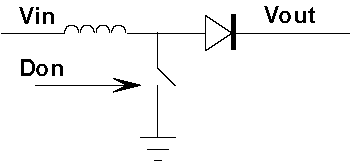
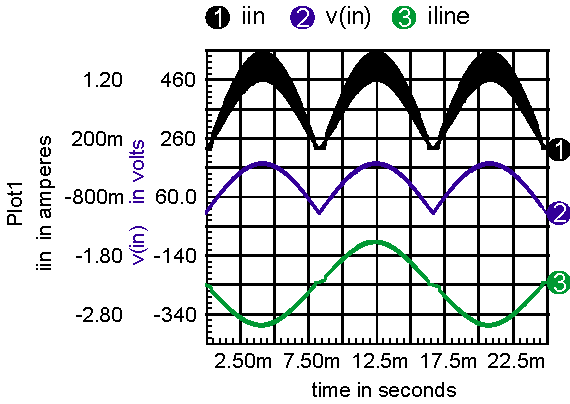
| If you’re into power supplies, you’ll recognize that the boost circuit is widely used for power factor correction, PFC, circuits. The way it works is by using a control system that makes the input current waveform proportional to the input voltage, such that Iin = k*Vin. If that can be done accurately over the entire cycle, then unity power factor is achieved. Then, a lower frequency control loop is used to control the output voltage. A large output capacitor limits the ripple to an acceptable value. An ideal circuit and its waveforms are shown in Figure 11.
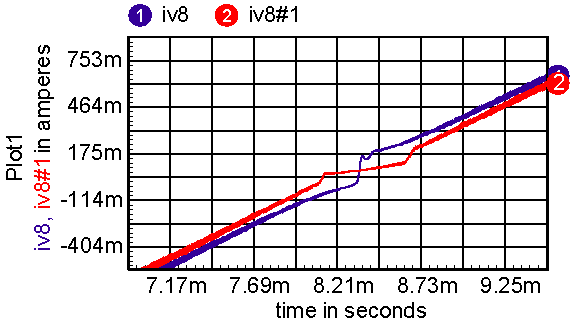
Figure 11: An ideal PFC and its waveforms with Don limited to .95. The circuit runs into trouble as the input voltage and current approaches zero. Output voltage at steady state is given by Vout = Vin/(1-Don). Typically, Don is limited to something like .97, so that maximum boost in Vin/.03 = 33*Vin. Note: if there was no Don limit, then the circuit could get stuck at Don=1. When the switch capacitance is included, the boost limit can be compromised further because of the finite rise time of the flyback waveform. When the flyback voltage is less than the output voltage, there is no output current flow. When a current is switched into an L-C network, the voltage is a ringing sine wave. Solving for the time to rise to Vout requires computation of the inverse sine function, asin(). Even more interesting is the apparent resistance of the MOSFET, due to capacitive charge and discharge when there is no output conduction. That creates a resistive load at the input, which further reduces the waveform distortion. Figure 12 compares an ideal boost limited model with one that includes switch and diode capacitance. Figure 12: The expanded line-current waveforms illustrate the effect of adding MOSFET and diode capacitance in waveform 1. It’s possible to introduce the behavioral equations for asin() and the nonlinear load, using table models that circumvent the calculation of out-of-bound derivatives. These techniques have been incorporated in the NCP1650 average model in our power library. |
|
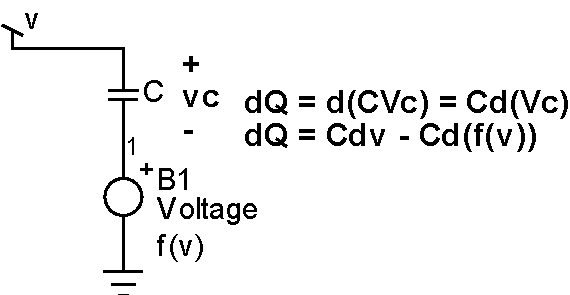
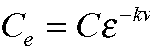
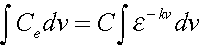
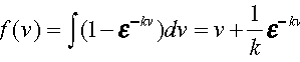
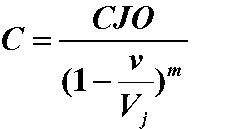
| Nonlinear capacitor models are required for any capacitor whose capacitance, C(V), is a function of the voltage applied to it. Using basic analog behavioral modeling tools in IsSpice4, such a non-linear capacitor model can be developed. Consider the model shown in Figure 13 below. Figure 13: Nonlinear Capacitor Model The model is made up of an ideal capacitor C and an arbitrary voltage source. The main task is to find an expression for B1 that will make this combination work as a nonlinear voltage-dependent capacitor model. Note, as indicated in Figure 13, the voltage for the new model is the sum of the voltage across the ideal capacitor and the voltage expression f(v) describing the B1 source. As an example, let’s define an effective capacitance as follows: Then, integrating with respect to v, and using basic circuit theory for the ideal capacitor (Q = C(v)*V), the following expression is obtained for the new model: Now we can solve for f(v), which is the expression needed to complete the model. The schematic (varicap.dwg) complies with this equation. It’s in close agreement when using a constant capacitor of value
Figure 14: Comparing nonlinear capacitor models As an application of this model, let’s model the capacitance of a reverse-bias diode. Note that for MOSFETs this may be the only way to model Gate-to-Source capacitance without inserting an actual diode in the model, which would not match the physics of the device. In general such a capacitance is described by the following: where v = v (anode,cathode). Substituting this in the equation for The schematic diodecap.DWG implements this model and compares it with the actual capacitance measurement. To generate the comparison plot below, a sweep needs to be run, plus a plot of the measured ce. One can do a “send script” to IntuScope by right-clicking on the appropriate script on the schematic.
Figure 15: Comparing diode capacitance models |
|
| There are a couple Trojans that corrupt or delete your “AUTOEXEC.NT” file. As a result, when trying to run our InstallShield installation, which makes use of 16-bit technology, an error message will be displayed as follows:
Keep in mind that even though this message comes up, worst yet, the AUTOEXEC.NT file may actually be missing. So, verify that you have the file by typing "%windir%\system32" in the address bar of the Explorer window. If there is no AUTOEXEC.NT file, then:
The installation will now work. |
ICL (Interactive Command Language) uses variables to control the IsSpice4 simulator options and corresponding output data options. A variable is manipulated with the ICL set or foreach command. The variable value is accessed by placing $ in front of the variable name. All .OPTIONS parameters are automatically considered variables. All other predefined variables are listed with the set command in the “script syntax” help, or IsSpice4 Users Guide manual. Here is an example that manipulates predefined variables. |
|
| set temp=125 set units=degrees |
;set global circuit temperature to 125 degree C |
Now, if you want to sweep through a list of values, you can use the foreach command. The foreach command does the commands between the "foreach" and the "end" lines, once for each value listed. When the loop starts over, the variable becomes the next value in the list. Reference the foreach variable in your command scripts by placing a $ in front of the variable name. Foreach Syntax:
Foreach Example:
|
|